- explorer
- search
- README.md
CG.Base
Provide tool kits that helps you fast build an app on Code.Gamelet.
Key features include: 1. initialize pixi.js environment 1. load and access resources that are imported via Code.Gamelet IDE 1. manage update functions that are called every frame 1. provide debug utilities
Getting Started
Follow the steps below to fast start an app with PixiJS.
We will implement a box2d environment to demo the usage of Base.
Start with Pixi.js
class App {
    constructor() {
        // initialize pixi
        CG.Base.pixi.initialize(600, 400);
        CG.Base.pixi.physicsDebugDraw.setActive(true);

        // make a physics wall
        var wall = CG.Base.physics.createPhysicsObject('wall', {type: 'static'});
        wall.addEdge(new CG.Base.geom.Point(10, 300), new CG.Base.geom.Point(500, 330));
        // make a dynamic physics ball
        var ball = CG.Base.physics.createPhysicsObject('ball', {type: 'dynamic'});
        ball.addCircle(0, 0, 10, {friction: 0.1, density: 0.1, restitution: 0.3});
        ball.setPosition(100, 10);
    }
}
new App();
@see Demo
Load and play with Resources
To load resources that are imported from IDE:
// tell resources what resources to load (using the alias names)
CG.Base.resourceManager.addAppResource('Game1.button');
CG.Base.resourceManager.addAppResource('Game1.music');
// start loading
CG.Base.resourceManager.load(() => {
    // all loaded callback
    // create button with the image "Game1.button" alias name
    var button = new CG.Base.pixis.interactive.Button(CG.Base.resourceManager.createPixiSprite('Game1.button', 20, 20));
    // set the position of the button
    button.displayObject.position.set(100, 100);
    // add the button to pixi.root, so pixi can render the button
    CG.Base.pixi.root.addChild(button.displayObject);
    // add a click event listener
    button.on(CG.Base.pixis.interactive.Button.EVENT.CLICK, () => {
        // when the button is clicked, play sound with "Game1.music" alias name
        CG.Base.resourceManager.playSound('Game1.music')
    });
});
@see Demo
Manage update functions
Take advantage of CG.Base.addUpdateFunction to make a function called every frame
class App {
    constructor() {
         CG.Base.pixi.initialize(600, 400);
         CG.Base.addUpdateFunction(this, this.update);
    }
    // this function will be called every frame(called 60 times per second normally)
    private update(deltaTime:number):void {
        // do something
    }
}
new App();
@see Demo
You can call a function in the future by CG.Base.addDelayFunction
class App {
    constructor() {
         CG.Base.pixi.initialize(600, 400);
         // call this.delayAction in 1000 milliseconds(= one second)
         CG.Base.addDelayFunction(this, this.delayAction, 1000);
    }
    private delayAction():void {
        // do something
    }
}
new App();
@see Demo
Interact with Keyboard
Use CG.Base.keyboard package to interact with keyboard events.
export class App {
    constructor() {
        // make the window focused, so we can receive keyboard events.
        window.focus();
        // initialize pixi
        CG.Base.pixi.initialize(600, 400);
        // tell resourceManager to load the resource 'Game1.button'
        CG.Base.resourceManager.addAppResource('Game1.button');
        // load resources, and wait callback when resources are all loaded
        CG.Base.resourceManager.load(() => {
            // add keyboard event listener, when a key is pressed
            CG.Base.keyboardManager.on(CG.Base.keyboard.KeyboardManagerEvent.PRESSED, key => {
                // if the pressed key is space, we call this.createSprite()
                if (key == CG.Base.keyboard.Key.SPACE) {
                    this.createSprite();
                }
            });
        });
    }
    private createSprite(): void {
        // create a sprite with the image 'Game1.button'
        var sprite: PIXI.Sprite = CG.Base.resourceManager.createPixiSprite('Game1.button');
        // set the position of the sprite
        sprite.position.set(CG.Base.utils.IntUtil.randomBetween(100, 500), CG.Base.utils.IntUtil.randomBetween(100, 300));
        // add the sprite to pixi.root, so it can be rendered
        CG.Base.pixi.root.addChild(sprite);
    }
}
new App();
@see Demo
Debugging
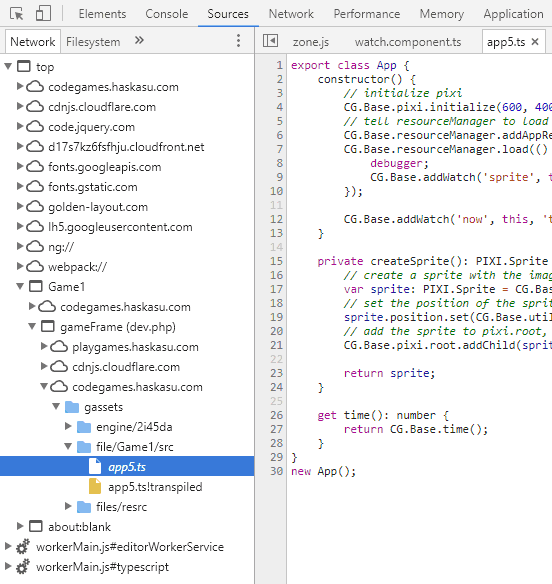
The best debug tool on browser is the developer tools in Chrome (F12).
To find your source code in developer tools, first open developer tools(F12), click "Sources" tab, and search the Network tree as below:
top => {projectCode} => gameFrame => code.gamelet.com => gassets => file/{projectCode}/src
for example, if the projectCode is 'Game1', source code is located at
top => Game1 => gameFrame => code.gamelet.com => gassets => file/Game1/src

Add Watch
In addition to browser's debugging tools, CG.Base provides other useful tools.
CG.Base.addWatch() adds objects or objects' properties to Watch panel in CG IDE.
export class App {
    constructor() {
        // initialize pixi
        CG.Base.pixi.initialize(600, 400);
        // tell resourceManager to load the resource 'Game1.button'
        CG.Base.resourceManager.addAppResource('Game1.button');
        CG.Base.resourceManager.load(() => {
            // add the created sprite into Watch panel, the alias name in Watch panel is 'sprite'
            CG.Base.addWatch('sprite', this.createSprite());
        });
        // add this(App)'s 'time' property into Watch panel. The alias name for this property is 'now'
        CG.Base.addWatch('now', this, 'time');
    }
    private createSprite(): PIXI.Sprite {
        // create a sprite with the image 'Game1.button'
        var sprite: PIXI.Sprite = CG.Base.resourceManager.createPixiSprite('Game1.button');
        // set the position of the sprite
        sprite.position.set(CG.Base.utils.IntUtil.randomBetween(100, 500), CG.Base.utils.IntUtil.randomBetween(100, 300));
        // add the sprite to pixi.root, so it can be rendered
        CG.Base.pixi.root.addChild(sprite);
        return sprite;
    }
    // a getter function, that works like a property of App object.
    get time(): number {
        return CG.Base.time();
    }
}
new App();
@see Demo
Versioning
We use SemVer for versioning.
Links and Resources
This library is running with the libraries below.
- Pixi.js - 2D rendering engine
- Pixi keyboard - Keyboard utility
- Pixi sound - Sound utility
- Pixi filters - Filters Collections
- Pixi GafPlayer - GafMedia Player
- Liquidfun - Box2D based physics engine
- MD5 - MD5 implementation by Joseph Myers
Authors
Haska Su - Initial work
- problem
- console